Want help turning consistency into progress? Coaching keeps your training simple, structured, and sustainable.
Start Coaching →
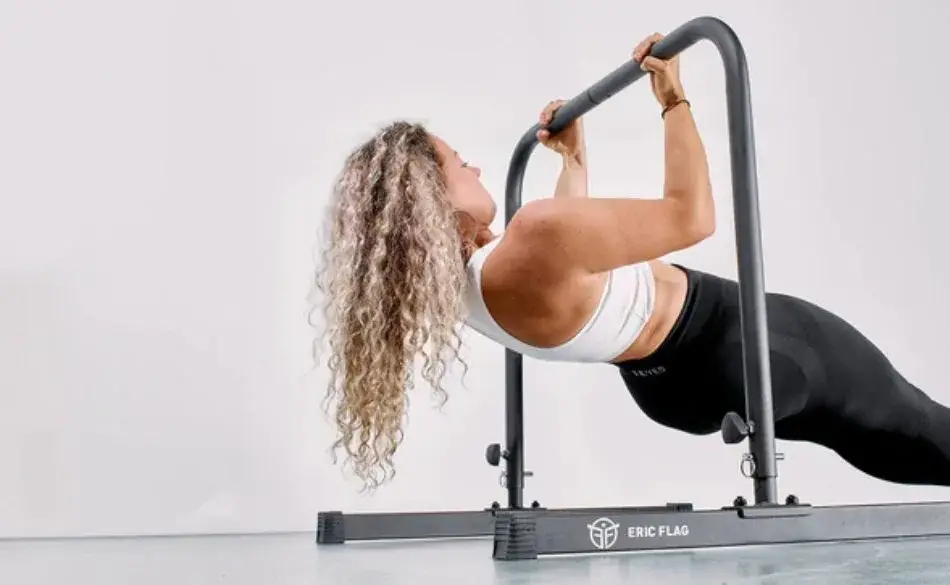
Woman performing an Australian pull up on parallel bars to strengthen back muscles

Last updated:

Australian Pull-Up Guide: Technique, Muscles, Progressions & Training Plan

The Australian pull-up — also called the inverted row or bodyweight row — is one of the most effective and underrated upper-body exercises. It builds the back, biceps, and core strength you need for full pull-ups, improves posture for people who sit at a desk all day, and can be done almost anywhere with a low bar, a Smith machine, or even a sturdy table. Here's the complete guide: proper form, muscles worked, 6 progressions from complete beginner to advanced, common mistakes, and a 4-week training plan.

Chat with a SportCoaching coach

Not sure where to start with training?

Tell us your goal and schedule, and we’ll give you clear direction.

No obligation. Quick, practical advice.

Article Categories:

Explore our fitness training advice for more helpful articles and resources.

Quick Answer

An Australian pull-up is a horizontal pulling exercise performed under a low bar. You pull your chest to the bar while keeping your body in a straight line. It targets the lats, rhomboids, traps, biceps, and core. Adjust difficulty by changing body angle: more upright = easier, more horizontal = harder. It’s the #1 progression exercise for building toward full pull-ups.

How to Do an Australian Pull-Up: Step-by-Step

1. Set up. Find a bar at roughly waist to hip height. A Smith machine, barbell on a squat rack, dip bars, or outdoor fitness park bar all work. Make sure the bar is secure and won’t move.

2. Position yourself. Sit on the ground underneath the bar. Grip it with an overhand (pronated) grip, hands slightly wider than shoulder-width. Your thumbs should wrap under the bar.

3. Set your body line. Extend your legs in front of you, heels on the ground. Brace your core and squeeze your glutes so your body forms a straight line from head to heels — like a plank, but facing up. Don’t let your hips sag.

4. Pull. Retract your shoulder blades (squeeze them together), then pull your chest toward the bar. Lead with your chest, not your chin. Keep your elbows at roughly 45° from your body — not flared out to 90°.

5. Touch and hold. Aim to touch your lower chest to the bar. Pause for a beat at the top — this is where the mid-back muscles work hardest.

6. Lower with control. Extend your arms fully and return to the start position. Maintain your body line throughout — no dropping the hips on the way down.

Muscles Worked

👉 Swipe to view full table

MuscleRoleCompared to Vertical Pull-Up
Latissimus dorsi (lats)Primary mover — extends and adducts the shoulderSimilar activation
RhomboidsRetract the shoulder blades — pull them togetherHigher activation in Australian pull-up
Middle trapeziusAssists scapular retractionHigher activation in Australian pull-up
Biceps brachiiFlexes the elbow during the pullSimilar activation
Rear deltoidsAssists shoulder extensionHigher activation (horizontal pull angle)
Forearms / gripMaintains hold on the barLess demand (partial body weight)
Core (rectus abdominis, obliques)Maintains rigid body lineDifferent demand — isometric plank position
GlutesPrevents hip sagMinimal in vertical pull-up

The key difference from vertical pull-ups: Australian pull-ups place more emphasis on the mid-back (rhomboids, mid-traps, rear delts) and less on the lats. This makes them exceptionally good for improving posture — exactly the muscles that weaken from sitting at a desk. For a complementary exercise that targets the same area, the Helms row is another excellent option.

6 Progressions: Beginner to Advanced

👉 Swipe to view full table

LevelVariationSetupSets × Reps
1. BeginnerHigh bar, bent kneesBar at chest height. Feet flat, knees bent at 90°. Body at ~45° angle.3 × 5–8
2. Beginner+High bar, straight legsBar at chest height. Legs extended, heels on ground. Body at ~45°.3 × 8–10
3. IntermediateLow bar, straight legsBar at waist/hip height. Body nearly horizontal. Full body weight demand.3–4 × 8–12
4. Intermediate+Low bar, pause repsSame as above but pause 2–3 seconds at the top of each rep. Increases time under tension.3–4 × 6–10
5. AdvancedFeet elevatedFeet on a box or bench at the same height as the bar. Body fully horizontal. Much harder.4 × 8–12
6. Advanced+Weighted / rings / archerAdd a weighted vest, use gymnastic rings (adds instability), or do archer rows (one arm takes more load).4–5 × 6–10

How to progress: When you can comfortably complete 3 sets of 12 reps at one level with good form, move to the next. The jump from level 2 to 3 (lowering the bar) is the biggest — take your time with it. Most people spend 2–4 weeks at each level.

Grip variations: Overhand (pronated) grip emphasises the back and rear delts. Underhand (supinated) grip shifts more work to the biceps and lats — this variation is sometimes called the Australian chin-up. A neutral grip (palms facing each other, using rings or parallel bars) is the most shoulder-friendly option and works the brachialis more.

Common Mistakes

Hips sagging. The most common error. If your hips drop, your core isn’t engaged and you lose the training effect. Think “plank position” the entire time. Squeeze your glutes as if you’re doing a bridge.

Flaring elbows to 90°. This shifts load from your back to your shoulders and increases injury risk. Keep elbows at 45° from your body — think “row,” not “fly.”

Partial range of motion. If your chest doesn’t reach the bar, you’re missing the strongest contraction at the top. Lower the difficulty (bend knees, raise bar) rather than doing half reps.

Using momentum. Jerking or swinging turns a controlled strength exercise into chaos. Each rep should take 2–3 seconds up and 2–3 seconds down. If you need momentum, you’re at a progression level that’s too advanced.

Chin poking forward. Your chin should stay neutral — don’t crane your neck to touch the bar. Lead with your chest, and think about pulling your sternum to the bar.

4-Week Australian Pull-Up Programme

This plan takes you from beginner to a solid intermediate level. Perform this programme 3 times per week on non-consecutive days (e.g., Monday / Wednesday / Friday). Choose the progression level that matches your current ability from the table above.

👉 Swipe to view full table

WeekSets × RepsTempoRestNotes
Week 13 × 62 sec up, 2 sec down90 secFocus on form. Squeeze shoulder blades at top.
Week 23 × 82 sec up, 2 sec down90 secAdd 2 reps per set. Maintain form — no sagging hips.
Week 34 × 82 sec up, 3 sec down75 secAdd a set and slow the descent. This builds strength faster.
Week 44 × 102 sec up, 3 sec down60 secIf you complete all 4 × 10, move to the next progression level and restart at Week 1.

After completing this 4-week cycle at one progression level, drop back to 3 × 6 at the next level and repeat. This progressive approach builds real strength without overloading joints or tendons.

How Australian Pull-Ups Fit Into Your Training

As a pull-up progression. If you can’t do a full pull-up yet, Australian pull-ups are the single best exercise to get you there. Work through progressions 1–5 over 8–16 weeks, and you’ll build the back, bicep, and grip strength needed for your first unassisted pull-up.

As a warm-up. 2 sets of 8–10 at an easy progression before a pulling workout activates your lats, rhomboids, and scapular stabilisers. This primes the muscles for heavier work.

As a back accessory. Even if you can do full pull-ups, Australian pull-ups are a valuable accessory. The horizontal pulling angle targets the mid-back muscles (rhomboids, mid-traps) more than vertical pulling, which is essential for balanced upper-back development and posture. Include them in your strength training programme alongside vertical pulls for complete back development.

For endurance athletes. Runners, cyclists, and triathletes benefit from strong upper backs — it supports posture during long efforts and prevents the hunched position that develops over hours on the bike or during late-race running fatigue. Pair with core work and seal walks for a complete upper-body stability routine that takes 15 minutes.

Where to Do Australian Pull-Ups

Gym: Smith machine (lock the bar at the right height), squat rack with a barbell, or cable machine rack. These are the most adjustable setups.

Home: A sturdy table (lie underneath and pull your chest to the edge), a broomstick across two equal-height chairs (test stability first), or a pull-up bar in a doorframe set at a lower height if adjustable. TRX straps or gymnastic rings hung from a high point also work.

Outdoors: Playground bars, outdoor fitness parks, fence railings, or any horizontal bar at roughly waist to hip height. Australia’s outdoor fitness parks are ideal for this — which may be why the exercise carries the name.

FAQ: Australian Pull-Ups

What is an Australian pull-up?
A horizontal pulling exercise under a low bar. Also called an inverted row or bodyweight row. Targets lats, rhomboids, traps, biceps, and core.

What muscles do they work?
Primary: lats, rhomboids, middle traps. Secondary: biceps, rear delts, forearms, core, glutes. More mid-back emphasis than vertical pull-ups.

Are they good for beginners?
Yes — one of the best beginner pulling exercises. Adjust difficulty by changing body angle. They’re the standard progression toward full pull-ups.

How do I make them harder?
Lower the bar, elevate feet, add pause at the top, use slower tempo, add a weighted vest, use rings, or try archer variations.

How many should I do?
Beginners: 3 × 5–8. Intermediate: 3–4 × 8–12. Advanced: 4–5 × 10–15. Include 2–3 times per week.

The Best Horizontal Pull You're Probably Not Doing

The Australian pull-up doesn’t get the respect it deserves. It builds real, functional pulling strength, it’s infinitely scalable from complete beginner to weighted advanced athlete, it’s one of the most effective exercises for posture correction, and it requires almost no equipment. Whether you’re using it to build toward your first full pull-up or as a permanent part of your back training, it delivers. Add it to your programme, progress through the levels, and your back — and your posture — will thank you.

Want Strength Training Built Into Your Programme?

Our coaching includes strength work alongside your endurance training — pull-ups, rows, core, and glute exercises that make you stronger and more resilient.

Start Coaching →

Graeme - Head Coach and Founder of SportCoaching

Graeme

Head Coach & Founder, SportCoaching

Graeme is the founder of SportCoaching and has coached more than 750 athletes from 20 countries, from beginners to Olympians, in cycling, running, triathlon, mountain biking, boxing, and skiing. His coaching philosophy and methods form the foundation of SportCoaching's training programs and resources.

750+
Athletes
20+
Countries
7
Sports
Olympic
Level

Start Your Fitness Journey with SportCoaching

No matter your goals, SportCoaching offers tailored training plans to suit your needs. Whether you’re preparing for a race, tackling long distances, or simply improving your fitness, our expert coaches provide structured guidance to help you reach your full potential.

  • Custom Training Plans: Designed to match your fitness level and goals.
  • Expert Coaching: Work with experienced coaches who understand endurance training.
  • Performance Monitoring: Track progress and adjust your plan for maximum improvement.
  • Flexible Coaching Options: Online and in-person coaching for all levels of athletes.
Learn More →

Choose Your Next Event

Browse upcoming Australian running, cycling, and triathlon events in one place. Filter by sport, check dates quickly, and plan your training around something real on the calendar.

View Event Calendar