


Find Your Next Running Race
Ready to put your training to the test? Here are some upcoming running events matched to this article.
 Coach Graeme
Last updated:
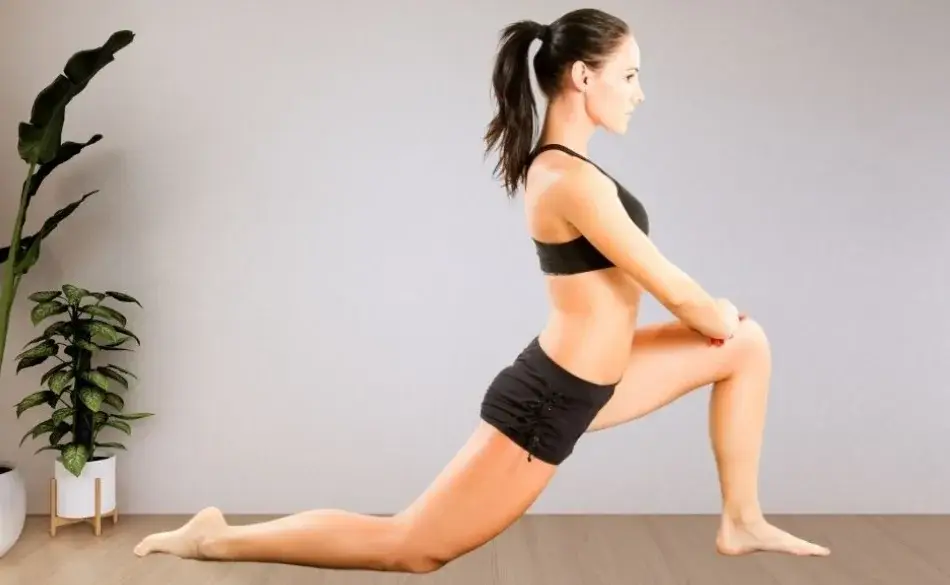
The runner's lunge is one of the most useful single movements a runner can add to their routine — not because it's complicated, but because it targets the exact physical limitation that affects most runners: tight hip flexors. The hip flexors, particularly the psoas major and iliacus, are shortened by both prolonged sitting and the running stride itself. When they are chronically tight, they pull the pelvis into an anterior tilt, restrict hip extension during running, and increase the load on the lower back at every stride. The runner's lunge, done correctly and consistently, directly addresses this problem in a way that most other stretches don't.
This guide covers the muscles worked, step-by-step form, the most common mistakes, when to use it in training, and the key variations that make the movement more versatile across warm-up, cool-down, and strength contexts.
Not sure where to start with training?
Tell us your goal and schedule, and we’ll give you clear direction.
No obligation. Quick, practical advice.
Explore our running workouts and tips for more helpful articles and resources.
The runner’s lunge is a compound position that does several things at once, which is part of why it’s efficient. Understanding what each body part is doing helps you get more from the position and correct form errors when they occur.
The back leg is the primary target in stretch terms. With the back leg extended and the hip lowering toward the floor, the hip flexors of that leg — primarily the psoas major, iliacus, and the rectus femoris (one of the four quadriceps muscles that also crosses the hip joint) — are placed in a lengthened position. These muscles are the most commonly shortened in both runners and desk workers, and they attach directly to the lumbar vertebrae and inner pelvis, meaning their tightness has direct consequences for lower back health and running mechanics.
The front leg is working rather than resting. The quad and glutes are bearing load in a single-leg stance position. The hip abductors (glute medius) are actively stabilising the pelvis. The calf and ankle are managing balance. For a stretch that most people think of as purely passive, there is a meaningful strengthening demand on the front leg — which is part of why it transfers well to running, where every stride is a brief single-leg stance.
The core engages to prevent the lower back from rounding or collapsing into excessive extension. This is the key postural element that most people lose in the runner’s lunge — and losing it reduces the effectiveness of the stretch significantly. The lower back should remain long and neutral, not arched or rounded.
Additionally, the groin and inner thigh (adductors) are stretched through the wide split-leg stance, and the front ankle and calf experience a mild dorsiflexion stretch depending on foot position.
| Step | What to do | Key cue |
|---|---|---|
| 1 | Start in a standing position, or from a downward dog or plank position | Neutral spine before you move |
| 2 | Step the right foot forward, placing it between your hands (or in front of you if standing) | Take a big enough step — wider than you think |
| 3 | Position the right knee directly over the right ankle — shin vertical and perpendicular to the floor | Front knee stacked above ankle, not sliding forward |
| 4 | Extend the back (left) leg straight behind you, resting on the ball of the foot or the top of the foot (toes down) | Back leg long and engaged, not collapsed |
| 5 | Place hands on the floor on either side of the front foot, or on blocks if the floor is too far away | Arms are support — don't dump weight into them |
| 6 | Square the hips toward the front — both hip bones facing forward, not rotated open | Imagine headlights on your hip bones pointing straight ahead |
| 7 | Lengthen the spine: draw the chest forward and up, keeping a neutral lower back — not arched, not rounded | Long spine from crown to tailbone |
| 8 | Breathe slowly and sink the hips lower toward the floor with each exhale | Don't force the depth — let the breath deepen the stretch |
| 9 | Hold 30–60 seconds, then switch sides | Both sides equally — notice which is tighter |
The key setup point is step 3: the front knee must stay over the ankle. This is the most commonly broken form point in the runner’s lunge, and it’s the one that creates knee discomfort. If the knee slides forward past the toes, it compresses the patellofemoral joint and reduces the glute engagement in the front leg. The fix is simple: step the front foot further forward. Most beginners don’t step far enough, which forces the knee to compensate by sliding forward to achieve enough depth.
The other critical point is step 7: spine position. Many people round at the lower back to get their hands closer to the floor. This defeats the purpose of the stretch — when the lumbar spine rounds, the psoas and iliacus (which attach to the lumbar vertebrae) are no longer in a stretched position. If the floor feels too far away, place hands on yoga blocks or on the thigh of the front leg. A tall spine in a shallower lunge is far more effective than a rounded spine in a deep one. Our complete guide to tight hip stretches covers related hip flexor and hip mobility exercises that complement the runner’s lunge.
The psoas major is unique among muscles in the body: it is the only muscle that connects the lumbar spine to the lower limb. It originates at the sides of the lumbar vertebrae (L1–L5) and the intervertebral discs, runs through the pelvis, and inserts at the lesser trochanter of the femur. This means that a tight psoas does not just pull on the hip — it pulls directly on the lumbar vertebrae, increasing compression and extension load through the lower spine.
During running, the hip flexors generate the forward swing of the leg. But they also need to lengthen fully during the push-off phase as the hip extends behind the body. A chronically shortened psoas limits this hip extension, reducing stride length, increasing anterior pelvic tilt, and shifting compensatory load to the lower back. This is the mechanism behind much of the lower back pain runners experience — not a problem with the back itself, but a restriction in hip extension that the back compensates for with each stride.
The runner’s lunge places the back leg hip in maximal extension while the pelvis remains squared forward, which is exactly the end-range position that the psoas needs to be loaded and lengthened through. Held with a tall spine and deep breathing, it is one of the most targeted hip flexor stretches available without equipment. Our guide to lower back pain when running covers this hip flexor–lumbar spine connection in more detail, including the anterior pelvic tilt mechanism and the exercises that address it.
Before a run, avoid holding the runner’s lunge statically for extended periods. Research consistently shows that static stretches held for 60+ seconds before exercise can temporarily reduce muscle force output and power — the opposite of what you want immediately before a training session or race. Instead, use a dynamic rocking version: enter the lunge position and gently rock the hips forward and back with each breath for 10–15 repetitions per side, spending 2–3 seconds in each direction. This mobilises the hip flexors and surrounding tissues without the muscle-relaxing effect of a prolonged static hold. Follow this with leg swings (front-to-back and side-to-side) for a complete hip warm-up before running. Our warm-up and cool-down guide covers how to structure a complete pre-run preparation routine.
After a run is the optimal time for static runner’s lunge holds. The muscles are warm and pliable, and there is no subsequent power output to protect. Hold each side for 45–60 seconds, performing 2 sets. Breathe slowly and deeply — the exhale phase is when the nervous system releases tension and the muscle genuinely lengthens. Rushing through a 15-second stretch in each leg is not sufficient to produce flexibility changes. Consistent 45–60 second holds performed 4–5 times per week over 6–8 weeks are what produce meaningful improvements in hip flexor length.
On rest days or after strength sessions, the runner’s lunge can be held for up to 90 seconds per side as a more focused flexibility session. Combining it with adjacent hip stretches — butterfly/groin stretch, pigeon pose, or figure-4 — creates a complete hip opening routine that takes 10–15 minutes and significantly reduces the stiffness that accumulates across a running week. Our strength training programme for runners covers how to schedule mobility work alongside strength sessions to maximise the combined benefit.
Front knee sliding past the ankle. The most common error. Usually caused by stepping the front foot too close to the hands, which forces the knee forward to achieve depth. The fix: step the front foot significantly further forward than feels natural — enough that the shin remains perpendicular to the floor when the hips are lowered. If the knee is tracking forward, move the front foot forward and try again.
Rounding the lower back. Often happens when the athlete is trying to get the hands to the floor but lacks the hip mobility to do so with a neutral spine. The fix: use blocks or place the hands on the thigh. Keeping the chest lifted and the spine long is non-negotiable — without it, the hip flexors are not in a stretched position regardless of how deep the lunge looks.
Hips rotating open. The back hip tends to open and rotate upward rather than staying square. This is the body’s way of cheating — the hip flexor is less stretched when the pelvis rotates. The fix: actively squeeze the inner thighs toward each other (as if trying to close a gap between the legs) and consciously square both hip bones to the front. A useful cue: imagine two headlights on your hip bones pointing straight forward.
All weight in the hands. When the runner’s lunge is performed purely as a passive stretch, many people sink their weight into their hands, which reduces core and front-leg engagement and makes the position less transferable to running movement patterns. The fix: lighten the hands — they should provide stability and balance assistance only, not bear the majority of the body’s weight. Lift the fingertips slightly to check: if balance becomes impossible, you were relying on the hands too heavily.
Back knee collapsed to the floor too early. Dropping the back knee is a valid beginner modification, but many intermediate athletes default to it before they’ve actually developed enough hip mobility to hold the position correctly with the knee up. If the knee is down, there is less stretch in the back hip flexor because the pelvis doesn’t need to drop as far. The knee-down modification is appropriate when building up — but the goal should be progressing to the knee-up position over time.
Lower the back knee to the mat. This reduces the balance demand and allows a slightly deeper hip drop with less risk of form breakdown. The hip flexor stretch is still present but less intense than the full knee-up version. Ideal for beginners, very tight hip flexors, or when injury prevents the back leg from bearing full extension load. Hands can rest on the front knee rather than the floor.
From the runner’s lunge position, raise both arms overhead with the palms facing each other. This version lifts the weight of the arms above the centre of gravity, increasing the demand on the core and front-leg quad and glute. The back knee remains lifted. The high lunge adds a strength component to the stretch, making it a useful exercise in warm-up sequences where both hip opening and muscle activation are needed. Known in yoga as Crescent Lunge or Ashta Chandrasana.
From the runner’s lunge, place one hand on the floor or block, and rotate the other arm toward the ceiling — opening the chest in the direction of the front leg. Hold for 30 seconds then rotate to the opposite direction. The lunge with twist adds thoracic spine rotation to the hip flexor stretch, addressing the rotational stiffness that develops in runners who spend hours moving only in the sagittal (forward) plane. It also further activates the core obliques. Our lower leg strengthening guide covers complementary exercises for the lower kinetic chain that pair well with hip mobility work.
Enter the runner’s lunge position. With each inhale, shift weight slightly backward (reducing the stretch). With each exhale, sink the hips forward and down (deepening the stretch). Rock gently for 10–15 breaths. This dynamic version primes the hip flexors, activates the glutes, and progressively opens the hip through movement rather than a static hold. It is the preferred form for pre-run use because it stimulates rather than inhibits the muscles being warmed up.
A dynamic forward-moving version of the lunge where each step becomes a lunge position and the back leg drives forward to complete the next step. Walking lunges shift emphasis to the glutes, hamstrings, and hip abductors, making them a strength exercise as much as a stretch. They are directly specific to running mechanics — each step mimics the hip extension and single-leg loading of a running stride. Best used in strength training sessions rather than immediately before a run. Sets of 20 metres (10 strides per leg) are a standard prescription in runner strength programmes.
Run Stronger With Better Mobility and Structured Training
SportCoaching's running training plans include warm-up and cool-down protocols, strength work guidance, and the structured weekly progression that builds the hip mobility and leg strength to run injury-free.
What is a runner’s lunge?
A lower body stretch and mobility position where one foot steps forward into a lunge stance — front knee over ankle, back leg extended — with hands on the floor or raised. It stretches the hip flexors of the back leg and strengthens the front leg’s quads, glutes, and core. In yoga it is called low lunge or crescent lunge. For runners, it directly addresses hip flexor tightness caused by sitting and running.
What muscles does the runner’s lunge stretch?
Primarily the hip flexors of the back leg: psoas major, iliacus, and rectus femoris. Also the adductors/groin through the wide stance. The front leg works the quads, glutes, and hip abductors. Adding trunk lean stretches the back-leg hamstrings; adding a twist mobilises the thoracic spine.
How long should you hold a runner’s lunge?
30–60 seconds per side for static flexibility (post-run or recovery days), 2–3 sets. For pre-run warm-up, use a dynamic rocking version for 10–15 repetitions per side rather than a static hold. Prolonged static stretches before running can temporarily reduce muscle power output.
Why is the runner’s lunge important for runners?
Tight hip flexors restrict hip extension during running, shortening stride and increasing lower back load. The psoas attaches directly to the lumbar vertebrae, so its tightness has direct consequences for both performance and pain. The runner’s lunge targets this exact muscle group in the position where it most needs to be lengthened.
What is the difference between a high lunge and a low lunge?
Low lunge has the back knee resting on the floor or hovering close, hands on the floor — emphasises the hip flexor stretch. High lunge lifts the back knee and raises arms overhead — adds core and balance demand, more strengthening. The low lunge is more accessible for stretching; the high lunge is more demanding and activating.
Ready to put your training to the test? Here are some upcoming running events matched to this article.


Head Coach & Founder, SportCoaching
Graeme is the founder of SportCoaching and has coached more than 750 athletes from 20 countries, from beginners to Olympians, in cycling, running, triathlon, mountain biking, boxing, and skiing. His coaching philosophy and methods form the foundation of SportCoaching's training programs and resources.
No matter your goals, SportCoaching offers tailored training plans to suit your needs. Whether you’re preparing for a race, tackling long distances, or simply improving your fitness, our expert coaches provide structured guidance to help you reach your full potential.
Smart, progressive training from 5km to marathon with weekly guidance.
What’s included
Browse upcoming Australian running, cycling, and triathlon events in one place. Filter by sport, check dates quickly, and plan your training around something real on the calendar.
Choose your plan to get started with personalized training plans designed to help you reach your goals.


Minna Backman
When you’re new, feedback is especially important, and Graeme is highly skilled at both analyzing numbers and understanding the importance of mental strength.