


Find Your Next Cycling Race
Ready to put your training to the test? Here are some upcoming cycling events matched to this article.
 Coach Graeme
Last updated:
Not sure where to start with training?
Tell us your goal and schedule, and we’ll give you clear direction.
No obligation. Quick, practical advice.
Explore our cycling training advice for more helpful articles and resources.
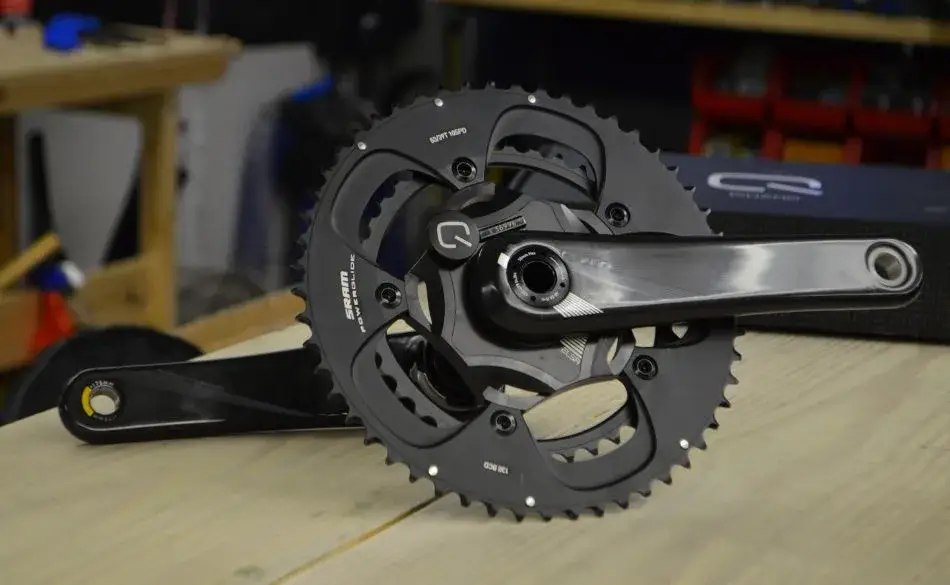
A power meter on bike measures the mechanical power you produce every time you pedal. It does this using strain gauges, which are precise sensors that detect minute flex in metal components such as the crank arm, spider, pedal spindle, or rear hub. When you apply force, the strain gauge measures torque (rotational force) and, when combined with cadence (revolutions per minute), calculates power output in watts using the formula Power = Torque × Angular Velocity.
This is currently the gold-standard method for quantifying cycling effort. Power readings remain consistent regardless of wind, gradient, or temperature changes, provided the unit is properly calibrated and temperature (compensated). A feature included in nearly all modern devices (Garmin Rally, Favero Assioma, Quarq DZero, 4iiii Precision 3.0).
Heart-rate data, by contrast, can drift with fatigue, heat, or caffeine. That’s why power-based training has become the preferred system for cyclists, triathletes, and coaches: it measures what you do, not how you feel. This allows for precise workload control, defined power zones, and measurable progression across weeks or seasons.
Here’s a comparison of the main bike power meter types:
👉 Swipe to view full table
| Power Meter Type | Installation Point | Best For | Pros | Cons |
|---|---|---|---|---|
| Pedal-based | Inside pedal spindle (e.g., Garmin Rally, Favero Assioma) | Riders swapping bikes frequently | Easy installation, dual-leg data | Limited cleat options (LOOK/SHIMANO) |
| Crank-arm | On left or right crank (e.g., 4iiii Precision 3.0) | Road or triathlon cyclists | Lightweight, affordable | Single-leg measurement unless dual setup |
| Spider-based | Between chainrings (e.g., Power2Max, Quarq DZero) | Performance-focused riders | Very consistent, weather-resistant | Requires specific crank compatibility |
| Hub-based | Inside rear hub (e.g., PowerTap G3, now legacy) | Older trainers or TT bikes | Reliable and protected | Harder to swap between bikes |
All modern power meters communicate via ANT+ and Bluetooth, allowing connection to head units and training apps like Garmin Connect, Wahoo, Zwift, and TrainingPeaks.
When used correctly, a power meter removes the guesswork from training, helping riders pace climbs, build endurance, and recover effectively. It’s not just for pros, it’s a tool for anyone who wants measurable improvement.
Want to make the most of your power meter on bike? Our professional Cycling Coaching program helps you turn your data into performance breakthroughs. We’ll design structured sessions based on your FTP, wattage tracking, and recovery patterns so you can train with precision and purpose.
Don’t just collect numbers, learn how to use them. Train smarter, ride stronger, and unlock your full potential with personalized power-based coaching.
Start Your Coaching Plan →Once you start using a power meter on your bike, you unlock the ability to train with scientific precision. This approach, known as power-based training, divides your workouts into specific power zones (each targeting different physiological adaptations). It replaces guesswork with measurable structure, allowing you to ride efficiently and recover effectively.
The first step is finding your Functional Threshold Power (FTP), which represents the highest average power you can sustain for about an hour. According to TrainingPeaks and British Cycling, FTP typically corresponds to 95% of your 20-minute maximal power test. Once you have this number, your cycling app or head unit can automatically calculate your personalized power zones.
Here’s what structured power zone training achieves:
This kind of wattage tracking is what separates casual riders from those who truly progress. One athlete I coach increased his tempo power from 220 to 240 watts in ten weeks while maintaining the same heart rate. A sign of improved efficiency and endurance.
The benefit of training with power is not just speed; it’s control. You’ll know when to push and when to back off, helping you avoid overtraining while still improving steadily.
With consistency, you’ll develop an intuitive feel for your cycling power meter readings. Over time, 200 watts won’t just be a number, it’ll represent your own sense of rhythm and strength on the bike.
Adding a power meter on bike remains one of the most effective ways to improve your cycling performance. It transforms training from guesswork into measurable progress. Still, understanding both the advantages and limitations helps you make the most of your investment.
The Benefits
The Drawbacks
Despite these limitations, most riders find the advantages far outweigh the drawbacks. A power meter on bike doesn’t just make you stronger, it makes you smarter, more efficient, and more aware of how your body performs.
Choosing the right power meter on you bike can seem overwhelming at first. There are several types, each with its own strengths, price points, and technical quirks. Once you understand where each measures power and how it fits your setup, the decision becomes much easier.
A cycling power meter can be installed in four main areas: the pedals, crank arm, spider, or crankset. Each location affects accuracy, power balance detection, and ease of transfer between bikes. Pedal systems, like the Favero Assioma Duo or Garmin Rally, are the most portable, while crank-based options such as 4iiii Precision 3.0 are lightweight and affordable. Spider-based systems like Quarq DZero or Power2Max NGeco are known for high power meter accuracy (typically ±1.0%) and durability, ideal for riders who want integrated, long-term setups.
Below is a comparison based on 2025 pricing and performance data:
👉 Swipe to view full table
| Power Meter Type | Typical Cost (AUD) | Accuracy Range | Ideal Rider | Ease of Installation |
|---|---|---|---|---|
| Pedal-based | $800–$1,200 | ±1.0% | Riders swapping bikes often | Very easy — installs like pedals |
| Crank-arm | $400–$700 | ±1.5% | Budget-conscious road cyclists | Simple — replaces crank arm |
| Spider-based | $900–$1,300 | ±1.0% | Competitive riders, road or triathlon | Moderate — requires crank compatibility |
| Dual-sided | $1,000–$1,500 | ±0.5% | Performance-focused athletes | Easy to moderate, depending on model |
When choosing a power meter on bike, consider:
The right choice depends on your priorities (portability, precision, or price). Once installed and calibrated, a cycling power meter becomes an essential tool for tracking progress and training smarter.
Once your power meter is installed and paired on your bike, the key to improvement lies in how consistently you use it. Many cyclists collect power data but never analyze it. The goal isn’t to stare at numbers it’s to translate them into smarter training and pacing decisions.
Here’s how to make the most of your cycling power meter:
As I remind my coached athletes, a power meter on bike doesn’t make you faster by itself, it teaches you to train smarter. When you use your cycling power meter consistently, you begin to see how recovery days restore form, how small FTP increases matter, and how disciplined pacing often beats raw strength. If you’re curious about how much progress you can make over time, check out our guide on how much you can increase your FTP for realistic expectations and proven strategies.
Once you start riding with a power meter on bike, you’ll quickly notice a stream of numbers (average watts, normalized power, TSS, and IF). It might seem complex at first, but understanding what these metrics mean is the key to unlocking your potential.
Average power tells you your overall effort during a ride. However, it doesn’t always capture how hard it felt (especially on hilly terrain or during group rides). That’s where Normalized Power (NP) becomes essential. NP accounts for the variability of effort, offering a more realistic view of the ride’s true intensity.
Your Functional Threshold Power (FTP) is the cornerstone metric. It represents the highest power you can sustain for about an hour and forms the basis of all power-based training zones. According to TrainingPeaks and British Cycling, tracking changes in FTP is one of the most accurate ways to monitor progress. To understand more about what FTP really represents and how it affects your training, see our detailed guide on what FTP really means in cycling.
For example:
That improvement indicates increased aerobic efficiency. That means your engine is getting stronger without extra strain.
Another important metric is power-to-weight ratio (W/kg), which measures how many watts you can produce per kilogram of body weight. This is especially relevant for climbing and endurance performance.
At SportCoaching Australia, we help cyclists interpret this data effectively. Turning numbers into meaningful training decisions. Many of our athletes discover that once they understand their metrics, their training becomes more purposeful and less random.
In short, your cycling power meter is more than a data device. It’s a window into your fitness story, showing how every pedal stroke adds up to lasting improvement. To better understand your personal training zones and optimize your next ride, try our Cycling Power Zone Calculator for quick and accurate results.
Want to get the most out of your power meter on bike? Our Cycling Threshold Training Plan is designed to help you turn your power data into real performance gains. It combines precise power-based training, progressive intervals, and recovery sessions to build strength, endurance, and confidence on every ride.
Stop guessing your effort and start training with purpose. Build lasting power, ride stronger, and see measurable improvement with structured coaching support.
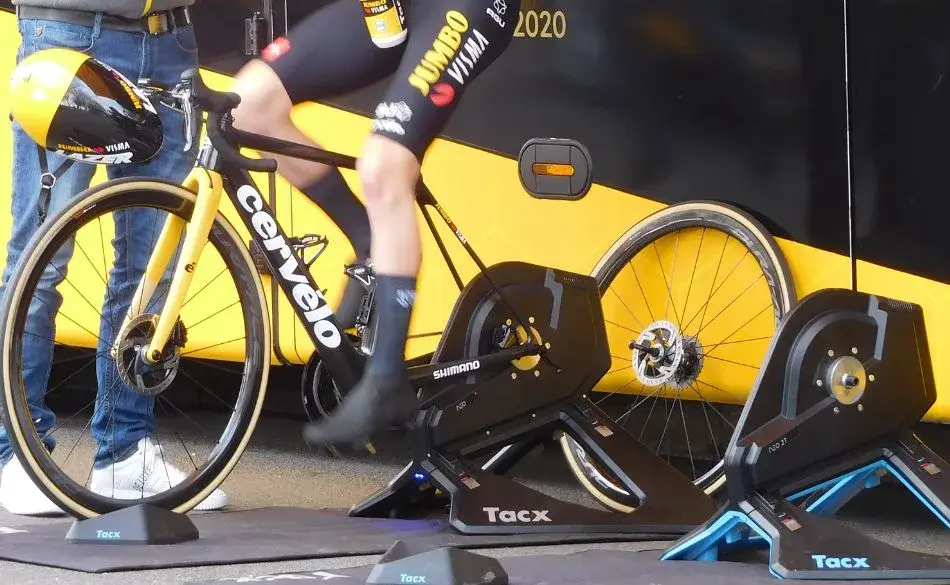
Start Your Power-Based Plan →One of the best things about a power meter on a bike is that it works in any setting. Whether you train outside or on an indoor trainer, your wattage tracking reflects true mechanical output. That gives you a consistent way to compare sessions across weeks and seasons.
Indoors, conditions are controlled with stable temperature and no wind or traffic. This makes it easier to complete structured power-based training and hit targets for endurance, tempo, or threshold without interruptions. It is ideal for repeatable intervals and precise recovery rides.
Outdoors, power helps you pace smarter. It guides steady effort over climbs, time trials, and race efforts so you do not surge early and fade. You can hold a target, adjust for terrain, and finish stronger.
To make the most of both environments:
Your physiological threshold does not change simply because you move inside. What often changes is how well you can express it due to cooling, motivation, and trainer dynamics. If you see a large gap between indoor and outdoor results, test in both settings and set practical targets for each. With a clear plan, your data tells one story of steady progress, no matter where you ride.
A power meter on bike can completely change how you train, but only if you use it correctly. Many riders overlook small details that limit the accuracy and value of their power-based training. Knowing what to avoid helps you get the most from your investment and stay on track toward your goals.
At SportCoaching Australia, we often see athletes improve simply by mastering these basics. When calibration, pacing, and recovery become habits, your cycling power meter turns into a precision feedback system that accelerates results and confidence on the bike.
With good routines, your power meter on bike helps you train smarter, recover better, and build sustainable strength for real-world performance goals. To discover short, high-intensity sessions that complement your power-based training, explore our guide on cycling Tabata intervals and learn how to boost both speed and endurance effectively.
Ready to put your power meter on bike to work? Our Cycling Training Plans are designed around real-world power data. Each plan uses your current FTP, heart rate, and effort zones to build structured sessions that actually move the needle on performance.
Stop guessing your effort—train with purpose. Use your power data to ride stronger, recover smarter, and reach your next performance level.
Explore Power-Based Plans →A power meter on a bike isn’t just another cycling gadget. It’s a gateway to smarter, more intentional training. When you learn to use it well, it replaces guesswork with clarity and turns every ride into meaningful progress.
With consistent wattage tracking, you start to see patterns – how recovery days restore form, how threshold sessions raise endurance, and how pacing transforms race results. Your cycling power meter becomes more than a data tool; it’s a reflection of your effort, discipline, and growth as an athlete.
At SportCoaching Australia, we’ve seen firsthand how athletes unlock new potential through power-based training. The key is consistency: calibrate often, review trends weekly, and align your zones with your current fitness. When you do that, you’ll not only ride stronger, you’ll understand exactly why.
So if you’re ready to take your training to the next level, a power meter might just be the best upgrade you ever make. It doesn’t just show how strong you are today, it shows how much stronger you can become tomorrow.
Ready to put your training to the test? Here are some upcoming cycling events matched to this article.
Head Coach & Founder, SportCoaching
Graeme is the founder of SportCoaching and has coached more than 750 athletes from 20 countries, from beginners to Olympians, in cycling, running, triathlon, mountain biking, boxing, and skiing. His coaching philosophy and methods form the foundation of SportCoaching's training programs and resources.
No matter your goals, SportCoaching offers tailored training plans to suit your needs. Whether you’re preparing for a race, tackling long distances, or simply improving your fitness, our expert coaches provide structured guidance to help you reach your full potential.
Structured cycling coaching to build power, endurance, and speed.
What’s included
Browse upcoming Australian running, cycling, and triathlon events in one place. Filter by sport, check dates quickly, and plan your training around something real on the calendar.
Choose your plan to get started with personalized training plans designed to help you reach your goals.


Minna Backman
When you’re new, feedback is especially important, and Graeme is highly skilled at both analyzing numbers and understanding the importance of mental strength.